
Siding defines the first impression of a home. It protects against rain, wind, and temperature swings, while also shaping curb appeal. A strong siding job extends the life of a house and reduces repair costs.
Contractors like PB Roofing follow a clear sequence to deliver high-quality results. Each stage plays a role in both performance and appearance. This guide explains the process step by step so homeowners understand what goes into a durable siding installation.
Preparation of the Surface
The project starts with a full inspection of the exterior. Old siding, loose nails, and soft wood must be removed. Any signs of rot or moisture damage are repaired before new material is placed. A stable and smooth base ensures the panels attach firmly. If preparation is skipped, siding may warp or detach prematurely. Proper groundwork is the first safeguard for long-term success.
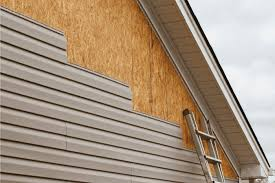
Installation of a Weather Barrier
After the surface is ready, a protective wrap covers the frame. This barrier stops water from seeping behind panels and allows vapor to escape. Without it, hidden leaks can slowly weaken the structure.
Seams, corners, and edges must be sealed with care. Overlaps are checked to prevent exposure in heavy rain. Though invisible after the siding goes up, this layer quietly protects the home for years.
Set up the Starter Strips
Starter strips provide the foundation for the first row of panels. They align the base and keep it level across the wall. Without strips, siding may tilt, and this leaves gaps that invite water. Contractors measure carefully and use precise fasteners to secure the strips. A straight base makes the rest of the installation easier and cleaner. It also ensures the roofline and siding lines stay visually balanced.
Panel Placement
Panels go up in rows; they start at the bottom and work upward. Each piece overlaps the one below to guide water away. Nails hold the panels firmly but allow slight movement for temperature changes.
A uniform pattern is crucial for both function and aesthetics. Straight lines give the home a polished appearance, while secure locks ensure weather resistance. The combination of detail and technique defines the success of this step.
Opening and Corner Frames
Openings such as windows and doors require special treatment. Panels are cut to fit precisely around them, and trim frames the edges. Corners also receive protective pieces to prevent water from entering.
This stage demands accuracy because errors here cause leaks and structural issues. Trim seals gaps and gives the siding a finished look. With careful framing, the home appears complete and well-protected.
Final Touches and Professional Help
The final step includes trim caps, caulk, and detailed sealing. These additions close small gaps and strengthen the system against moisture. They also provide a clean, sharp finish that boosts curb appeal.
While the steps appear manageable, proper siding installation requires expertise and equipment. Roofers like PB Roofing have the knowledge and precision needed for durable results. Their work ensures the investment pays off with strength, beauty, and minimal maintenance.
also read: Junior Tops: Ensuring Children’s Comfort From Surfing To Swimming
Residential siding installation involves six stages: surface preparation, weather barrier, starter strips, panel placement, framing of openings, and final touches. Each stage supports the next, creating a system that protects and enhances the home. With the knowledge of this process, homeowners can evaluate the quality of work and make informed decisions. With experienced contractors in charge, siding adds both durability and curb appeal. A step-by-step approach ensures the home stays strong and visually appealing for decades.